How To Add Perfect Decals with Citadel Technical Paints

This is a tutorial on using two of Games Workshop’s Citadel technical paints – ‘Ardcoat and Lahmian Medium – to apply decals to miniatures in a way so they appear to be perfectly part of the armour and are not clearly discernible as decals applied on top of the paint of a miniature.

This painting tutorial is a guest article by Tom from Mini Brush Studio.

This tutorial uses two Citadel Technical Paints:

  • ‘Ardcoat
  • Lahmian Medium

Step 1 – Where Do You Want A Decal?

Ultramarines Centurion Decal Tutorial

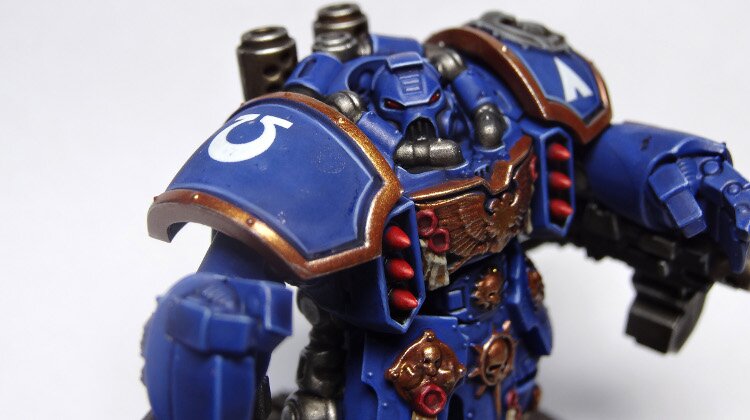
Choose a space on the miniature where you want to apply a decal. Make sure it is clear of dust or particles. For this tutorial, I’ll add a decal to the shoulder pad of this Ultramarines Centurion.


Step 2 – Prepare Surface with ‘Ardcoat

Space Marines Devastator Centurion Decals Shoulder Tutorial

Prepare the surface where the decal will go with a layer of Citadel ‘Ardcoat.


Step 3 – Apply Decal

Space Marines Decal Centurion How To

Now carefully apply the decal.


Step 4 – Apply a Second Layer of ‘Ardcoat

Space Marines Centurion How To Apply Decals Technical Paints

Now return to the space with another layer of Citadel ‘Ardcoat. The idea is to try and minimise to difference in surface levels between the (slightly raised) decal and the surrounding surface.


Step 5 – Finish with Lahmian Medium

Space Marines Devastator Centurion

When everything is dry, apply Lahmian Medium to matt the surface. At this stage, you should see the decal starting to blend in with the model as if it were a part of it.


Showcase: Ultramarines Devastator Centurions

Space Marines Devastator Centurion Squad Showcase

Here is a picture of the completed Centurion Devastator Squad. You can take a 360° view of this unit on YouTube.

About the author
Mini Brush Studio is a small studio doing commission painting. If you enjoyed this short tutorial, like Mini Brush Studio on Facebook or subscribe to their YouTube Channel.
Mini Brush Studio

Mini Brush Studio

Mini Brush Studio is a miniature painting studio doing commission painting. We are based in the heart of United Kingdom in a lovely little town known as Warwick.
Mini Brush Studio
  • belverker

    nice i will have to give that a try

  • Ruska

    This looks really useful and easily doable. I wrote off using transfer sheets when I got into the hobby ages ago because they always stood out. I’ll have to start trying this out on the rank and file models. Is there a special way to use this technique on areas like a knee pad that don’t have a raised edge surrounding them? With the shoulder pads it looks like the lip would catch any excess from running off.

    • KJensen

      There shouldn’t really be a reason to worry about shoulder pad lips or anything like that, as you really don’t have to lather the surface in hardcoat like on the pictures. A relatively thin layer will do the trick just as well.

      The reason you use varnish before applying the decal is to smoothen the surface and thereby both reduce friction, making it easier to position the decal, and to give the decal a more even surface to settle on.

      The reason you apply a layer of hardcoat after the decal is dry, is because you need to seal it in as it otherwise will wear/peel off rather quickly during handling.

      Once the second layer of hardcoat varnish is dry, you apply a coat of matt varnish (the tutorial uses Lahmian medium which… I’m not sure it’s a matt varnish to be honest, but has a similar effect) to remove the gloss of the hardcoat.

      Applying decals on flat surfaces like those in the tutorial is really easy, but you are probably going to hate using decals on shoulder- and knee pads. They are “double curved”, meaning the flat decal most likely won’t wrap nicely around the surface without some serious adjustments (cutting into the design itself to make it wrap nicely),

      It’s like trying to wrap a ball neatly in a flat piece of paper. You’ll have a really hard time doing it without cutting into the paper – and with decals there’s a design on the surface of the paper as well, which needs to fit neatly together.

      • Ruska

        Thanks for clarifying about not needing to lather on the hardcoat. Do you have any tips on cutting the decals? It seems like it would be easy on markings like chevrons, but I can’t think of a way to use the more intricate ones without making the final result look ‘off’.

        • KJensen

          Practice, practice and then some more practice.

          It’s always a good idea to cut really close to the decal image when cutting the decal from the sheet as it reduces the amount of material you have to wrap around the surface.

          Getting some decal softener is also a good idea, as that can reduce the amount of cutting you might have to do. It will make the surface of the decal more pliant and help smooth it across the surface, but does not magically fix all fitting issues caused by the underlying surface curvature.

          • Ruska

            Thanks for the tips. When you say decal softener, is that referring to something like “Micro Sol Setting Solution” on Amazon?

            Edit: Just saw the other comments about Micro Set/Sol, I’ll have to give them a try.

  • Master Crafted Minis

    I recommend using the same technique but applying Micro Set after Step 2 and Micro Sol after Step 3. Results should be near flawless.

  • http://www.flickr.com/photos/9360674@N04/sets/72157600510023664/ BrassScorpion

    While the GW products will do, you might want to try Micro Sol and Micro Set which are specifically designed for applying decals.

  • ProdigalPlayer

    I’d like to say that while I use the Micro Set/Sol, I also finish with Lahmian Medium because it dulls the shiny surface that decals naturally have.